React with TypeScript and Parcel
In this tutorial I will explain how to setup a react project from scratch without using the popular create-react-app approach.
Before everything, we need to create a directory for our project files. Open your terminal or command prompt depending on your operating system and run the following command to create a directory and navigate to it.
mkdir awesome-react-project && cd awesome-react-project
Now, we need to create a new Node.js project. I’m going to use npm for this but feel free to use yarn if you prefer that. The following command will create a package.json file inside your previously created directory.
npm init -y
Since this is a React web application project, we need two major dependencies. The first one is react which is the core of React. The second one is react-dom for dealing with DOM interactions. The following command will install these two packages.
npm install react react-dom
After that we need to install and setup Typescript. One thing to note here is that this is a development dependency. That means we only need this for our development. When we deploy our web application, it's going to contain plain JavaScript because web browsers can't directly run Typescript.
We can install it using the following command. -D flag is used here to indicate this is a development dependency.
npm install -D typescript
Since we are using Typescript, we need few packages to provide type definitions for our dependencies. The following command will install these packages.
npm install -D @types/node @types/react @types/react-dom
That's all the dependencies we need. Next thing that need to be done is tell Typescript compiler how to compile our code. We can use a tsconfig.json file to do this. You can either create this file manually or just use Typescript compiler to generate it for you. The latter can be done using the following command.
./node_modules/typescript/bin/tsc --init
--init flag here instruct tsc to initialize a Typescript project and create a tsconfig.json file. It's very similar to what we did with npm --init before.
Then open that tsconfig.json file with your text editor and change its content as below.
{
   "compilerOptions": {
      "target": "es5",
      "module": "commonjs",
      "jsx": "react",
      "outDir": "./out",
      "rootDir": "./src",
      "strict": true,
      "esModuleInterop": true,
      "skipLibCheck": true,
      "forceConsistentCasingInFileNames": true,
      "lib": [
           "es2018",
           "dom"
       ]
    }
}
Now let's go over the options I used in this configuration file.
target: Specifies which version of ECMA script our source code should be compiled into. This is very important for browser comparability.module: Sets the module system for our program. For node projects, CommonJs is the most commonly used choice.jsx: Controls how our source jsx files will be represented in compiled code. react option will compile our source jsx into React.createElement calls.outDir: Sets the output directory for compiled code, or rather Javascript.rootDir: Sets the directory that contains our source code. In this project, we will create a src directory soon.strict: This enabled strong type checking, allowing us to catch many problems in our code beforehand.esModuleInterop: This fixes a problem with module imports. Refer to docs for more information.forceConsistentCasingInFileNames: This throws an error when we try to import files with different casings than on the disk.lib: These are libraries for Typescript to use. You can see a full list with explanations in docs.
Typescript has hundreds of configuration options. You can tweak these as you see fit by referring to the Typescript documentation.
Now let's create a directory for our source code. Inside the awesome-react-app directory, create a new directory named src.
Then we need to create two files inside that src directory named App.tsx and index.tsx. I will explain the purpose of these two files later.
After that, we need to create an another directory inside the src directory named public.
Inside that public directory, we need to create an another file named index.html. This will be the entry point for this app.
Your final directory structure should look like this,
└── awesome-react-project
    ├── node_modules
    ├── package.json
    ├── package-lock.json
    ├── src
    │   ├── App.tsx
    │   ├── index.tsx
    │   └── public
    │       └── index.html
    └── tsconfig.json
Now we can finally write some code for our demo. Let's begin with index.html file.
<!DOCTYPE html>
<html lang="en">
<head>
  <meta charset="UTF-8">
  <meta name="viewport" content="width=device-width, initial-scale=1.0">
  <title>Awesome React App</title>
</head>
<body>
  <div id="root"></div>
  <script src="./../index.tsx"></script>
</body>
</html>
Then we can work on the App.tsx file.
import React from "react"
export function App() {
    return (
       <div>
          <h1>Hello!</h1>
       </div>
    );
}
App.tsx contains a simple component named App. We will use this as our main view.
Next we can edit the index.tsx file.
import React from "react";
import ReactDOM from "react-dom";
import { App } from "./App";
ReactDOM.render(
 <React.StrictMode>
  <App />
 </React.StrictMode>,
 document.getElementById("root")
);
In this file we need to import the App component we created earlier. Besides that, we need to import ReactDOM module to render (display) our application in the web browser. React.StrictMode I used here is a tool for detecting problems in our React code. We can wrap our main component inside it and identify potential problems. You can learn more about it here: Strict Mode.
ReactDOM.render method has two arguments. The first one is our main component. In this case, it's our App. The second one is a reference to an element with the id root. This doesn't have to be an id. You can use something like querySelector to select an element you prefer instead. The main point here is that this should be a reference to an element in our html file. Our App component will get rendered inside this referenced element. If you get this wrong, nothing will be displayed in the browser.
In the index.html file we previously created, there is a <div> with the id root. When we call ReactDOM.render, a reference to that div is getting passed.
I assume this next part is going to be confusing to many of you. Because we directly link our index.tsx file using a regular script tag. (We use ./../ in the path because it's located outside the public directory). As far as we know, It's not possible to run these tsx files in our browsers directly. So, what's going on here?.
This is where module bundlers come in to play. One of the most popular ones many of you should already be familiar with is WebPack. It's the bundler included in create-react-app.
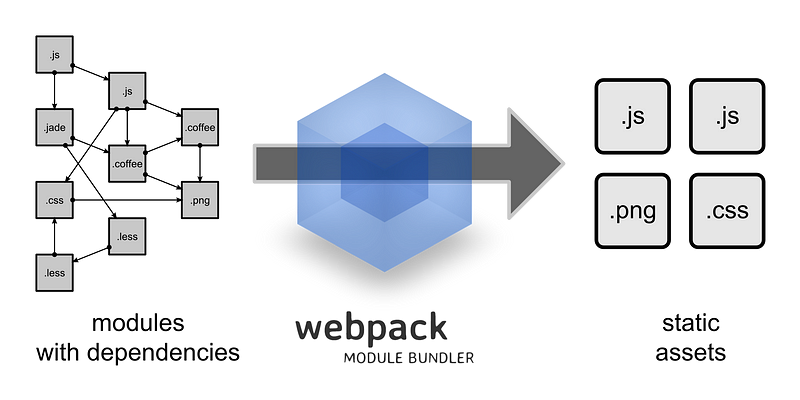
Source: Webpack Wiki
For this project, we are going to use a web bundler called ParcelJs. I chose this because it requires almost no configuration and it's really fast compared to most other bundlers out there.
Let's start by installing this into our project. This is also going to be a development dependency. Open your terminal inside the awesome-react-app directory and run the following command.
npm install -D parceljs
Next let's modify package.json file and add two scripts to make this easier.
{
  "name": "awesome-react-project",
  "version": "1.0.0",
  "description": "",
  "main": "index.js",
  "scripts": {
    "dev": "parcel src/public/index.html",
    "build": "parcel build src/public/index.html"
  },
  "keywords": [],
  "author": "",
  "license": "ISC",
  "dependencies": {
    "react": "^17.0.1",
    "react-dom": "^17.0.1"
  },
  "devDependencies": {
    "@types/node": "^14.14.19",
    "@types/react": "^17.0.0",
    "@types/react-dom": "^17.0.0",
    "parcel-bundler": "^1.12.4",
    "typescript": "^4.1.3"
  }
}
Note: you can remove "main": "index.js" line in here because we won't be needing it when working with ParcelJs.
The first script we added here is called dev . The great thing about ParcelJs is that it comes with a development server built-in. This means when making changes it will rebuild your files and update the web browser preview without manually having to refresh it. dev script tells Parcel to watch our index.html file. You can put this to test by opening your terminal and running that script like below.
npm run dev
It will output something like this,
Server running at http://localhost:1234
✨  Built in 3.21s.
We can goto this URL in the browser and view the App component getting rendered.
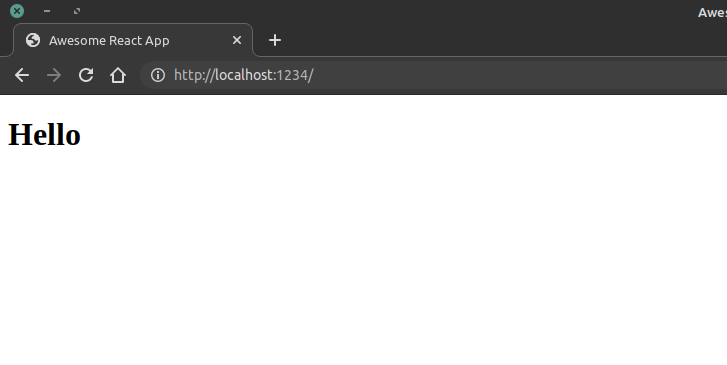
ParcelJS development server
Try making changes to your code and you will see the above output getting updated automatically. dev command is responsible for starting the development server. You can end this development server by pressing Ctrl+C in your terminal.
The next command we added was build. This tells Parcel to build a production ready version of our application. You can put this to test by running the below command in your terminal,
npm run build
Parcel will build a directory named dist inside the awesome-react-app directory. This will contain your production-ready code.
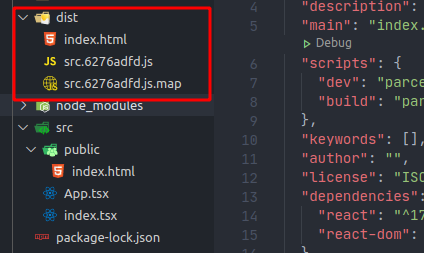
Outputs of Parcel build command
As you can see, Parcel created a single index.html file and a js file from our source. These contain everything required to run our web application.
Remember that index.tsx file we linked inside our index.html before?. Parcel saw it and bundled that and everything associated with it into a plain old JavaScript file web browsers can understand.